Using WebFX
Getting Access
WebFX is a LAN running Windows NT on both servers and user computers. In
order to access the system you must have 3 primary accounts and passwords:
-
WebFX network account - This username (e.g. x97xyz) provides you with access
to the WebFX domain, which consists of all users on campus, including staff,
faculty and students. When you sit down at a PC on campus and press the
Ctrl-Alt-Del
keys, you are asking the computer to let you enter your WebFX domain username
and password. You can modify your WebFX network account password by pressing
Ctrl-Alt-Del
and clicking the Change Password button.
-
WebFX Internet account - This username is identical to your WebFX domain
username (e.g. x97xyz) and may or may not have the same password. (If it
does not, you can make it the same so it is easier to remember.) This account
is required to access your e-mail account, special class discussion groups,
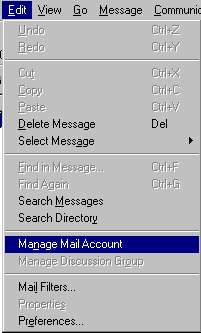
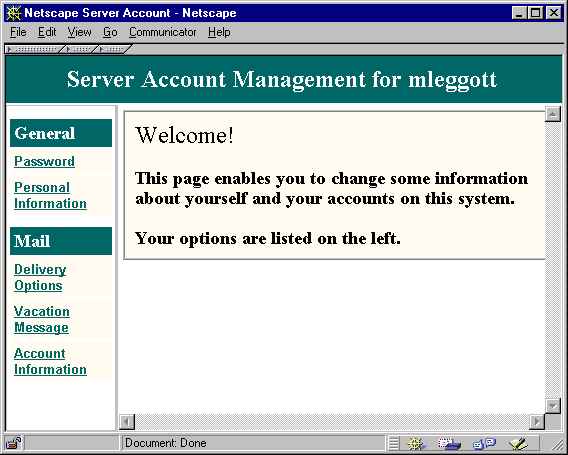
which you may have access to. You can modify your WebFX Internet account
password by selecting the Edit-Manage Mail Account menu option from
Communicator's Messenger Mailbox application.
This screen also allows you to set special mail options and modify your
personal description. The personal description is available to all users
on campus (and elsewhere) from the St.F.X. Directory in the Address Book
application.
-
WebFX Calendar account - All users have a separate username (Mark Leggott)
and password for the campus calendar system. This username uses a different
format with your first name and last name.
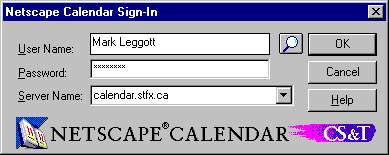
The password for your calendar account can also be set to the same value
as your other 2 accounts to make it easier to remember. You can modify
your WebFX Calendar account password by selecting the Edit-Change Password
menu option from Communicator's Calendar application.

As with all computing systems, you should always keep your username and
password private, as any unacceptable activities carried out with your
account could result in a loss of privileges. The campus Acceptable Use
Policy is available online and as part of the printed Community Code.
Network Directories
Each time you login to WebFX a standard set of network drives are available
to you to perform your work. These drives are available to you no matter
which campus computer you login from. The 2 most important ones are described
below.
-
Home directory (H:) - The H: drive is known as the
Home
Directory and is the location where you should store your working files
(e.g. term papers, assignments in progress, etc.) and any files you want
to have regular access to. Your Netscape Communicator settings and local
mail folders are also stored in this directory. The server which contains
your H: drive is backed every night, so there is also an added level of
security if you keep your files on this drive. Despite this however, you
should always keep backup copies of important files on floppy diskette.
-
Web directory (W:) - The W: drive is the directory
where your personal web homepage and supporting files are located. Any
files stored in this directory are, by default, publicly accessible on
the World Wide Web. When creating a homepage in the W: drive, it is
recommended that you name it welcome.html, as it will be loaded
by default when someone accesses your URL over the Web. The standard syntax
for a homepage on the WebFX system is:
-
http://www.stfx.ca/people/username/
For example, my URL would be:
As with any network directory, there are quotas set for both your H: and
W: drives. You should manage your account on a regular basis to ensure
that you are not using up your full quota, as this could result in lost
data or corrupt files.
Printing under WebFX
There are a number of network printers on campus for student use, including
dot matrix printers (printing is free) and laser printers (printing has
a cost). Printing under WebFX is easy, if you bear in mind some simple
rules:
-
Make sure you select the proper printer before you click the print button
- The most common mistake people make is to click the Quick-Print button
(e.g. in Word
 )
before selecting the printer from the File-Print menu option. The correct
printer is not chosen for you by magic - you must know the name of network
printer you want to use, and select it. The image below shows the list
of available printers as of Sept. 9, 1997.
)
before selecting the printer from the File-Print menu option. The correct
printer is not chosen for you by magic - you must know the name of network
printer you want to use, and select it. The image below shows the list
of available printers as of Sept. 9, 1997.
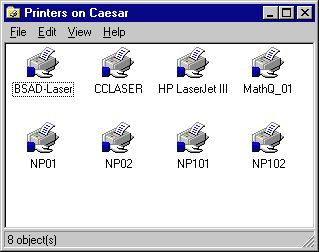
NP101 and NP102 are the printers available in the lab for this course
(NH123).
-
Make sure the printer is set to the top of the page - When using
lab printers, you should try and check that the printer is properly configured
before sending your job. This is not always possible, particularly when
busy.
-
Use the Print Preview function when available - Try not to waste
paper - check the print preview function to verify that your document will
print the way you want before you print it.
Backing Up Your Data
As mentioned previously, saving files in your H: directory can be one of
the best ways to backup your data. This network drive is backed up on a
daily basis, so in the event of a severe problem, you may be able to recover
data. However, it is costly in terms of systems resources (people
and hardware) to restore data from backup tapes, so you should still maintain
your own local backups of important data.
In order to ensure quick and easy access to backup files, you should
store important files and works in progress on floppy diskettes. This way
you can keep a copy with you, minimizing waiting time if you need to resort
to a backup. Floppy diskettes can be a useful backup source, as long as
you remember to:
-
label the floppy as a backup
-
check the floppy on a regular basis for bad sectors with the NT Error-Checking
Tool (right click the A: drive icon in Explorer, choose Properties-Tools-Error
Checking)
-
check the floppy on a regular basis for viruses (access the F-PROT program
from Start-Program Files)
-
use the write-protect tab when the floppy is not in use
Viruses
Viruses can be a frustrating source of problems with your floppies and
files, and can result in lost or corrupt data. The WebFX system has a powerful
virus-checking program (F-PROT Professional) which can prevent you
from having to deal with this problem.
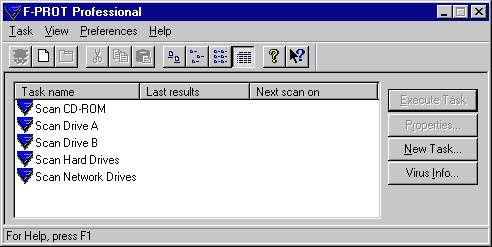
You can access F-PROT by choosing Start-Program Files-F-PROT
and then selecting the drive you wish to check. You should regularly check
your home directories (H: and W:) and any floppy diskettes that you use
or borrow.