Info 130.10 - Intro to Microsoft Word
Basics of Word Processing
All word processors do certain things the same and these things must be
understood if you are to use the programs effectively.
All word processors have the concept of an insertion point. This
is typically displayed as a vertical line between two characters. This
is where the characters will appear when you type. If you want to add text
at the beginning of the document you would move the insertion point to
the beginning of the document and start typing.
All word processors do word wrap. Word wrap lets the user type
a paragraph as one long string of text without pressing the Enter
key. Word wrap automatically wraps the lines according to the margins of
the document. If you adjust the margins word wrap will automatically "rewrap"
the lines to fit the margins.
Very closely related to word wrap is the concept of a hard return.
The hard return tells the word processor that you really want this line
to end here and not to append anything else to the line. The hard return
is created by pressing the Enter key. You can think of it as you
put in the hard returns using the enter key and word wraps puts
in soft returns whenever it needs to start typing on the next line.
Soft returns will move depending on margins, hard returns are in a fixed
position.
Another concept that we have seen in Windows NT is the concept of a
toggle switch. If you type on the keyboard the characters appear
in lower case. If you press the CAPS Lock key and type everything appears
in UPPER CASE. If you press CAPS Lock again what you type is in lower case
again. In effect the CAPS Lock key is a toggle switch between lower and
upper case. This concept is used in many places in word processors.
One of the most common is in the "mode" of typing. When you type in
a word processor you are either in insert mode or overtype
mode. Insert mode means that when you type the letters are inserted into
the document. Overtype mode means that when you type you are actually over
writing the text that exists now.
There are many ways to delete text in any word processor.
- The backspace key will delete characters on the Left of the cursor.
- The del key will delete characters to the right of the cursor.
- You can use the mouse to highlight an area of text by positioning the mouse, click and hold the left button and drag the mouse to the end of the area you want to clear, releasing the left mouse button and hitting delete.
- You can also move your cursor to a point (by clicking with the left mouse or moving it with the cursor motion keys), moving your mouse to the end of the point you want to select and holding the shift button down and hitting the left mouse button, then hit the delete key.
- The same effect can be achieved by moving the cursor to a point, holding down the shift key and using the arrow keys to select text, and
hit the delete key.
Introduction to MS Word
Microsoft Word is one of the most popular Word Processing systems. When
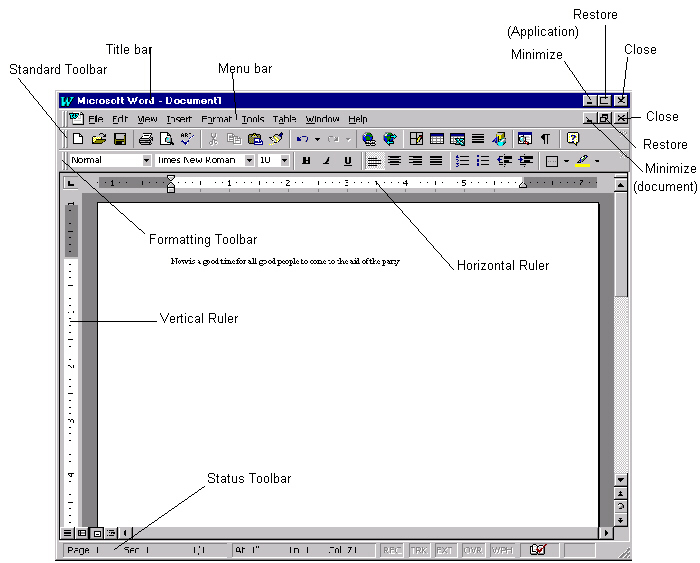
you run Microsoft Word you start the Application window. Inside
the Application window there is usually 1 document window started.
It is not uncommon to have several documentation windows inside 1 application
window. Microsoft Word has the standard Windows Minimize, Restore, and
Maximize buttons. Each document window it's own Minimize, Restore, and
Maximize buttons.
Beyond the standard Menu Bar MS Word gives you two toolbars that provide
quick access to the most commonly used functions.
The Standard Toolbar contains buttons corresponding to the basics
of Word: Open a file, Save, print ... If you position your cursor over
any of the buttons a ScreenTip Word will tell you the name of the
button. These are grouped loosely by function.
The Formatting Toolbar give you direct access to the common formating
functions such as: Boldface, Italic, ...
The Horizontal ruler is displayed under the toolbars and enables
you to change margins, tabs, and indents. The Vertical ruler shows
the current position on the side as well as allowing you to set the top
and bottom margins.
The Status Bar at the bottom of the window displays the location
of the insertion point.
The File Menu gives you the standard File Open, Save, Close, as well
as Word Specific items. For Example: 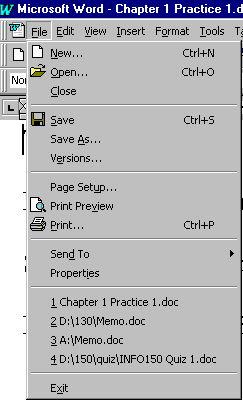
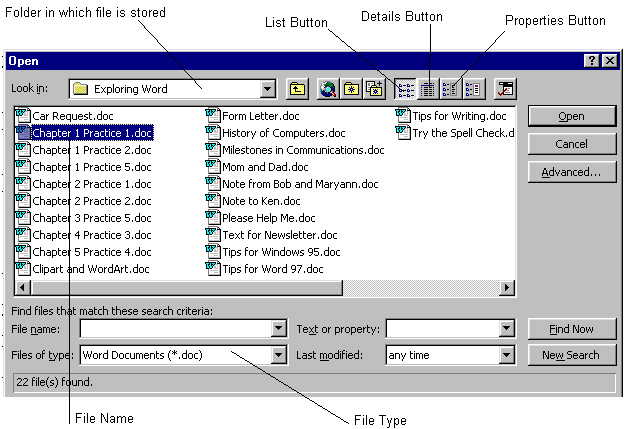
The Open gives you an open dialog box that is very similar to other
applications.
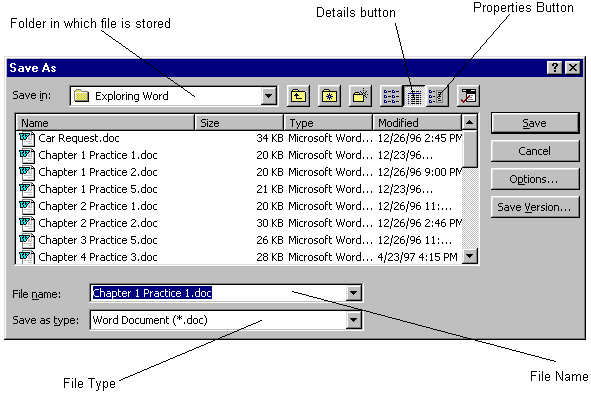
 The Save as dialog box
Anatomy of MS Word Window
Spell checkers
Spelling is one of the things that makes people not take your work seriously.
Incorrect spelling distracts from what you want to are trying to get across
to the reader.
When I was hiring entry level positions I would get a stack of resumes
an inch and a half tall. The first cull just reading for spelling mistakes
in the cover letter would wipe out 10 to 30 applicants. If they were not
interested enough in the job to get the spelling right they had to have
a very good resume to be taken seriously.
With modern spell checkers there is no reason to have spelling mistakes.
The mistakes are highlighted for you. All you have to do is click to get
a suggestion as to the correct spelling.
Often spell checkers have a real problem with people's names. However,
you can create you own custom dictionary. If you type in a word like Steve
Gallinger for example. When the red area is highlighted you can right click
on the word and then on the Spelling ... option. And then add it to your
dictionary.
Auto Correct
Auto Correct is a feature that automatically corrects simple typing or
spelling mistakes, and Word will automatically correct things line hte
into the.
You can change the Auto Correct to help you type things faster. If you
type Saint Francis Xavier University a lot you might want to make an Autocorrect
that changes STFX to Saint Francis Xavier University
Thesaurus
A thesaurus is an important tool for writers. It helps you avoid repetitive
phrases and makes it easier to get your point across when you are looking
for just the right word. You get access to the thesaurus from the Tools
menu. Click on Tools -> Language -> Thesaurus
Grammer Check
Grammer Check checks the actual grammer of your document and ATTEMPTS to
catch mistakes in punctuation, writing style and word usage. If you let
grammer check have free reign it will make your language rather bland and
uninspiring. But it is good for checking for simple mistakes. Grammer mistakes
show up in green.
There is no substitute for a good editor and proofreader. If you don't
have a friend willing to do so you have to be willing to read you own papers.
Save Command
There is nothing more frustrating than losing a document after two hours
of effort. Develop a practice of saving things at least every 15 minutes.
I usually do it once a page, or 15 minutes which ever is first.
Select Then Do
Many operations in Word take place in a select-then-do methodology. First
you select a block of text and then you do something with it. There are
two basic methods of selecting a block of text.
-
With the mouse
-
Click at the beginning of the text with the left mouse button hold it down
and drag until you get to the end of the area you want to select and then
let go of the left mouse button.
-
doubleclick on a word and it will select that word.
-
Ctrl plus a left click anywhere in a sentence will select a sentence.
-
and others.
-
With the keyboard. Move your insertion point to the beginning of the area
you want to select and while holding the shift key use the arrow keys to
select the block.
With the area selected a click of the Right mouse button will give you
a menu of actions appropriate to the item you have selected.
Moving and copying text
One of the most important things within Windows is the clipboard. Text
can be highlighted and then Cut or Copied to the clipboard and then pasted
into the same spot or another. The clipboard is a temporary storage location
available to all applications and infact this is often the easiest way
to exchange data between one application and another.
Cut, copy and paste are found in the Edit menu in almost all applications
and in Word is available on the Standard toolbar.
Undo and redo
We often make mistakes and what to undo what we just did the undo command
is found under the edit command in almost all windows applications and
is also available on the Word Standard Toolbar.
Redo is the reverse of an undo.
find, replace and goto commands
The find, replace, goto command available under the Edit menu allows you
to do quite sophisticated searches for text within your document. If you
click The MORE button on the screen it will show you a menu that
looks like this.

Consider the following text:
This is a test of the things that will make Word work at it's pattern
matching.
case sensitive searchs
Case sensitive searchs tells the computer that you are looking for the
Exact match of the text. For example a case sensitive search for Wor
would find Word but not work. Without the case sensitive switch selected
it would have found both Word and work.
whole words only
The Whole words only allows you to specify that you want to find a complete
word. A whole word search for A would abut not that, make,
at, pattern, or matching.
wildcard search
There are two wildcard characters that help us do searchs.
-
* representing 0 or more characters
-
? representing any one characters
A wildcard search for t*s would find 5 strings. A wildcard search for t??t
would find that and this
Scrolling by mouse and keyboard
You can scroll by using the mouse to move the slider bar or click on the
down arrow. This does not move the insertion point just the text being
displayed. You will have to click on the position where you want the new
insertion point or when you start to type the screen will be repositioned
to show the insertion point as you are inserting the text.
Scrolling by using the keyboard is actually moving the insertion point.
View Menu
The View Menu allows us to see different views of the same document.
-
Normal view is what we typically use to type in our text
-
Page Layoutview more closely resembles the printed document and
displays, Top and bottom margins, Headers and footers, page numbers, graphics
and other features that do not normally appear in the normal view.
-
theZoom command displays the document using different magnifications
or formats The Whole Page is good for seeing the "look" of the document,
but makes proofreading impossible.
Typography
Typography is the process of selecting typefaces, type styles, and type
sizes. Type should reinforce the message without calling attention to
itself. Try to limit the typefaces and the colors.
Typefaces
A typeface is a complete set of characters, including numbers and punctuation.
Characteristics of typefaces.
-
serif faces or non serif
-
proportional or monospaced.
type styles
Any typeface can be set in different type styles such as: regular, bold,
or italic.
font
A font as the term is used in windows is a specific typeface in a specific
style. For example: Times New Roman italic, Arial Bold
Type size
Type size is a vertical measurement measured in points or 1/72 of a inch.
The measurement is from the top of the tallest letter(say T) to the bottom
of the lowerest letter say "y".
Format Font command
Gives you complete control over the typeface, size, and style of the text.
Page setup
The page setup of the file menu lets you change margins, paper size, orientation,
paper source and layout.
When you change the paper size in word you must also change the paper
size in the printer control panel or you may get unexpected results. The
Page setup allows you to change the following attributes of a page
-
margins,
-
papersize,
-
orientation,
-
layout
Page Breaks
Just like soft returns and hard returns there are soft page breaks and
hard page breaks. A soft page break is inserted by word and will change
as required by the formatting of the document. A hard page break is inserted
by the typist and will not be moved by word.
If you want a hard page break hold the control down and hit Enter.
Paragraph formatting
A paragraph is a unit of text that Word can manipulate as a block
or unit. There are many attributes of a paragraph that can be adjusted.
Alignment
The alignment of a paragraph is the attribute that describes how the lines
of the paragraph look on the page. Does the start or end of each line align
on the left or right margin or are they ragged.
A paragraph can be aligned
-
Left - Flush left ragged right
-
Right - Flush Right ragged left
-
justified - Flush left and Right
-
centered - Centered (ragged left and right)
Indents
Indentation is the distance from the margin of the page to the text of
the paragraph. A paragraph can be indented in three ways: left, right,
or special. There are two "specials" first line indent and hanging indent.
Tabs
The tab key moves your insertion point to the next Tab Stop On the
old typewriters, hitting the tab key released the break on the carriage
and the carriage would slam across until the break encountered the next
"tab" of steel that would stop the carriage. Word tabs are rather more
sophisticated you can have left, center, right and decimal tab stops. You
can also specify a leader character to draw the readers eye across
the page to the next text.
Default tab stops are every 1/2 inch. but you can the alignment and/or
the position with the format Tabs command. The alignment of a tab stop
allows you to tell where the text is relative to the tab.
-
A left aligned tab stop will move the insertion point to the tab stop and
text will continue to type at that point.
-
A right aligned tab stop tells where the text ends This is useful for aligning
text at the right margin for something like a table of contents.
-
Center alignment centers the text over the tab stop.
-
Decimal alignment Lines up numbers according to the decimal point.
Line Spacing
Line spacing determines the space between the lines in a paragraph. You
can set line spacing by single, double, line and a half, as well as in
points.
Format Paragraph
Format Paragraph command is where you can specify the alignment, indentation,
line spacing, and pagination for the selected paragraph(s).
The Line and Page Breaks section of the Format Paragraph Command control
what happens to the paragraph at or near a page break.
Two terms that you may not be familiar with are widow and orphan. A
widow refers to the last line of a paragraph appearing by itself
on the top of the next page. An orphan refers to the first line
of the paragraph appearing by itself at the bottom of a page.
Borders and Shading
The Borders and shading allow you to call attention to a paragraph. The
tips and Hands on Exercises in the text book are examples of what can be
done with borders and shading.
A Compound Document
All of the applications in Microsoft Office are integrated and can share
information. They share information via a technology called Object Linking
and Embedding(OLE) OLE allows you to generate a compound document containing
data(objects) from multiple applications.
One of the most common things for you to include in your documents is
clipart or pictures.
Inserting clipart and pictures
Getting Clipart for your documents
The Microsoft Clip Gallery contains over 3,000 clip art images, and the
Internet has thousands more. There are sites that have collections of clip
art that can be used for a noncommercial use. Here are a few Clip art archives:
To save a picture on a web page in Netscape Communicator, position your
cursor over the picture you want to save and Right Click. The Right click
will bring up a menu and then select "Save image as ...", then save it
where you want.
Once you have a graphic, you can then insert it into a word document
by clicking on the Insert Menu, then picture, then "From File ..."
Microsoft Clip Gallary
You normally can get to the Microsoft Clip Gallery by clicking on the Insert
Menu, then picture, then clipart, you then browse through to find the images
you want.
Now you have a picture now what
There are lots of things you can do such as flowing text around the document.
Click on the picture then go to the format menu and at the bottom select
picture. This gives you a list things you can do with your text and picture.
When you clicked on the picture you should see the various sizing handles.
These sizing handles allow you to resize and move the document.
Insert Symbol Command
One of the things that make a document look better is the use of typographic
symbols rather than ordinary typing. For example a © rather than (C)
some substitutions are automatically available like 1/4 and 1/2 via the
Autocorrect command. Others like the those in the french character
set have to be inserted manually into a document.
MicroSoft WordArt
Microsoft WordArt is an application within Microsoft Office that creates
decorative text and adds interest to a document. To Use wordart click on
insert, picture, wordart. Select the style and then type in the text.
Resources from the Web
A hypertext document a document that contains a link to another
document. Hypermedia is a similar in concept, except in provides links
to graphic, sound, and video files. Every document in word is web enabled
If you click on the a URL in a word document it will automatically start
the web toolbar.
Copyright Protection
Copyright give legal protection for a written or artistic work. Please
be careful of acquiring anything off the net. It should be considered as
copyrighted material unless it explicitly states that it is in the public
domain. Often the clipart sites will state freely that their stuff is freely
available for non commercial use. READ carefully.
Copyrighted material does not mean that you can't use it at all. Fair
use depends on how much you use and for what purposes you use it. St. FX
is a signatory to something called CanCopy which protects the reproduction
of original works. According to your textbook, it is fair use to use a
portion of the original work for educational, nonprofit purposes, or for
the purpose of critical review or commentary. If you use an image or text
you should cite the original work in your footnotes and/or bibliography.
Not doing so could be considered plagerism by the university and may be
grounds for your dismissal from university.
Footnotes and Endnotes
A footnote provides more information about an item, it's original author
is the most common usage. The foot of the footnote indicates that
appears at the bottom of the page. The Endnote is very similar to footnote
but the end indicates that the note will appear at the end of the
document. You can tweek them to make them appear at other places. If you
use a site as a source then you should note them, it makes your documents
look more professional as well as protecting yourself against possible
plagerism charges.
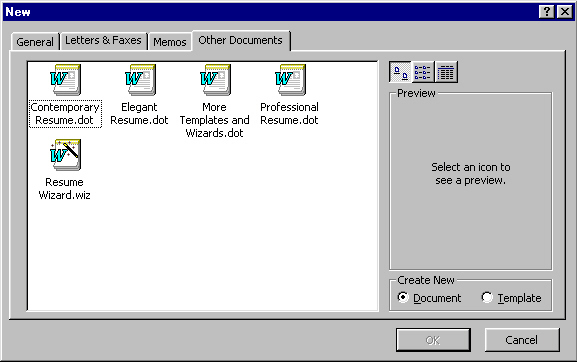
Wizards and Templates
A template is a partially completed document tat contains formatting,
text, and/or graphics. The templates can be very simple like a very basic
letter or very complex like a resume. Word provides templates for: resumes,
agendas, fax cover letters. To use them simply open the template and modify
the existing text as necessary, while retaining the formating.
A wizard makes the process even easier by asking a series of
questions, then creating a customized template based on your answers.
To Start the Resume Wizard select file then New then Other
Documents
 After you select the Resume wizard it will ask
you additional questions. You then complete the resume by entering the
specifics you would like.
After you select the Resume wizard it will ask
you additional questions. You then complete the resume by entering the
specifics you would like.